Showing posts with label make-up. Show all posts

Tuesday, 8 October 2013

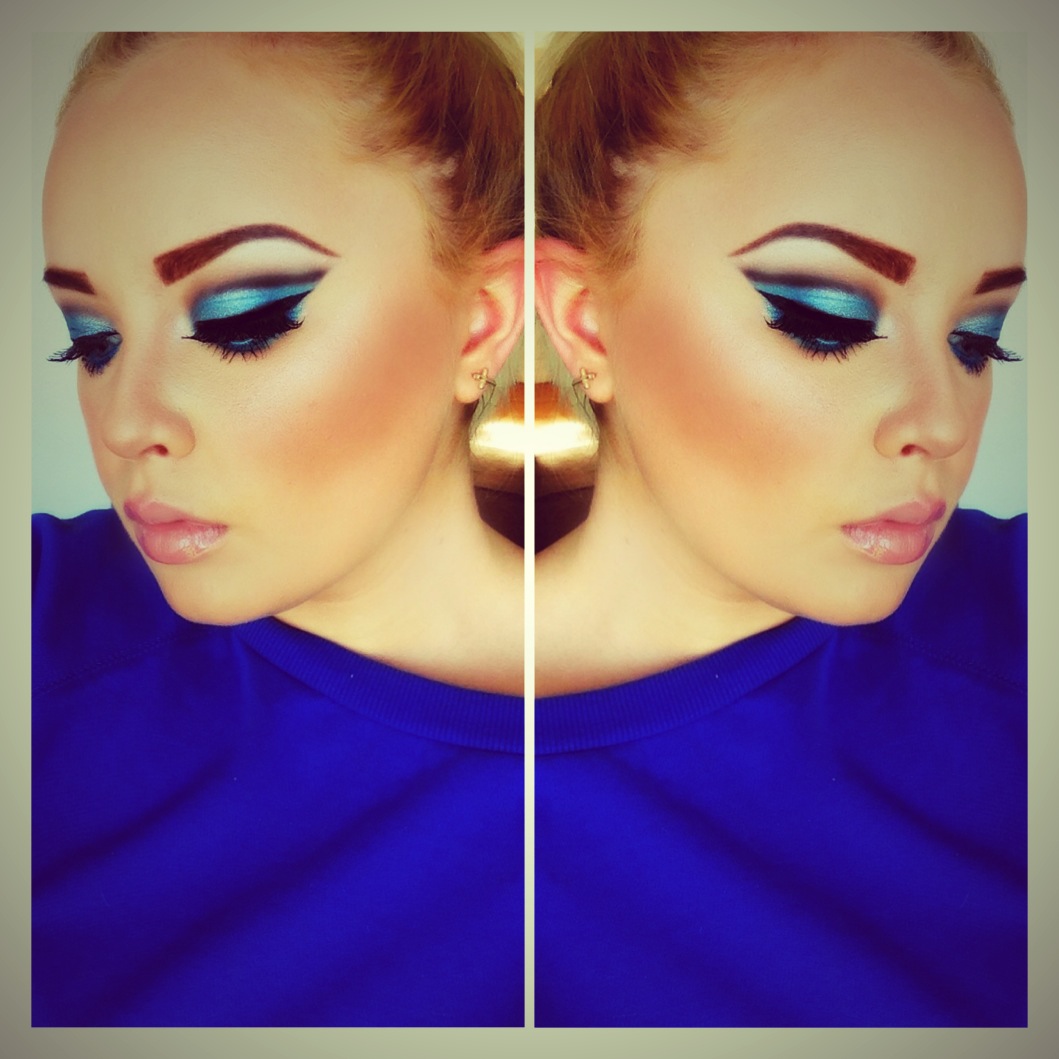
Finding my inner self | New makeup photos

Hi everyone, so this year has been an absolute roller-coast for me. Having only begun my Blog this year and everything going on I have been left to feel somewhat lost in what I want within life and what I actually want to pursue.
For three years now I have self taught myself makeup, having begun a career in TV & Film Production Things lead into me wanting to pursue a career in something a little more practical, something that I have a passion for & something that I will never get bored of. Being the shy girl I am, working in TV Production was just not for me. Although I love that field of work and every aspect of it, I felt I needed to have a lot more confidence If I wanted to go far. That lead me onto teaching myself makeup. I practice every single day and 3 years down the line I can now tell my skills have massively improved. The whole passion for makeup is the reason I begun this blog, Not knowing what direction the blog was going I begun writing away about various subjects, mostly beauty and I begun feeling slightly disappointed with myself, It was not how I imagined my blog to be, My passion was makeup and I wanted to show what I could actually do rather than writing reviews on products I used. Again, I feel my confidence is the reason that's pulling me back from achieving my dream. All women suffer from bad insecurities, even if its something small. Having suffered from severe depression this year It has completely kicked me off track, I am trying to rediscover myself and my life and I feel like I am finally beginning to get somewhere, That is why I feel I should begin a new blog, something fresh and something that actually means good to me, something I can blab away on for hours sharing my passion and showing what I can do. This blog will show more makeup posts and the odd few lifestyle and I am finally ready to begin from scratch.

Thank you anyone who is following me & reads my blog  and If any of you have a real interest for makeup like me then I'm sure you will enjoy this new revamp!

Here are a few makeup looks I have been creating to get myself on track...


If you have enjoyed this photos then I'm sure you will enjoy what's to come! :)

Wednesday, 21 August 2013

Maybelline colour tattoo pomegranate review


I am a huge fan of the Maybelline colour tattoo eyeshadow's, and have worn the colour bronze near everyday since purchasing. Whilst I was in Superdrug I fancied trying another shade to add to my collection, I was stuck between the beautiful blue shade or the pomegranate. Having blue eyes I went with the most practical colour for my eye shade and chose pomegranate.
Pomegranate punk is a shimmery metallic purple shade, It is probably one of my favourite colours. I found this needed around 2 coats to have the perfect coverage so really good considering the price. This shade is slightly more sheerer than the bronze which I previously purchased.

When I got home I was very excited to try this colour but was slightly disappointed with the outcome, on my eyes I felt it  gave me the 'I haven't washed my makeup off' Look, like slightly dirty, but maybe that is against my skin tone. I was really hoping this would be amazing like my first purchase but that didn't seem to be the case.

Performance wise, These are amazing. They last at least 10 hours on my lids which is great for when I'm feeling lazy! Another thing I love about this product is the packaging. It is very handy to have, for travelling, nights out and days where you simply can't be bothered to give yourself a makeover. I usually just use this with my fingers and it is very practical. I would probably use this eyeshadow as a base colour underneath a purple rather than on its own so I will still get my wear out of it.

Price: £4.99
Availability: Superdrug, Boots & most online makeup stores.

Have you tried this product? what did you think?


Tuesday, 20 August 2013

Lacura Beauty Concealer Pen Review


I love testing out new concealers all the time, Having used my Collection 2000 lasting perfection for ages, I decided to be more open minded and tried a even cheaper brand. I remember people comparing the Aldi Concealer pen to the Touché Éclat, I was easily please, especially knowing what a bargain this product was. 

Since I was near a Aldi this week, I decided to pop in and see what they had to offer. I seen that this concealer was around £3.59, absolute bargain for what I heard. Since they only had 3 shades I decided to get the lightest as I was mostly using this for highlight.
Another little bonus about this product is that it has not been tested on animals!

Firstly the packaging, it is basically the same as the YSL Touché Éclat but probably more cheap looking. At first it took a few attempts to actually get the product out as it's a clicky pen but once you get the hang of using the product, It only takes at least one click for you to get the amount of product you need to conceal.
I found the texture to be quite light when applied, you only need the slightest bit too so it saves! 
My only disappointment about this is that it dries too quickly before you get the chance to blend it in. A few times I have applied this as a highlight and it has dried before I had the chance to blend the product in, which is so annoying since the actual conceal itself lovely.

This concealer is not the best for coverage but its lovely if you are in need for a quick fix! I usually use this for a contour so under the eyes, chin, nose and forehead and it works great. This also lasts all day for me which comes in handy if your travelling or out and about all day.

I wouldn't say this is my ultimate favourite concealer but its something I will always have in my makeup collection. I would say this is on par with the Touché Éclat, if not better as your only paying a cheeky £3.59 woohoo!


Monday, 19 August 2013

Top 5 drugstore lipsticks under £5!


Left/Right

Revlon 'Volcanic Red'
This lipstick was around £3.50, cheap for nice red lipstick. I bought this over a year ago and I still use it all the time, not only is it long lasting but it comes in beautiful sturdy packaging!

17 Supreme shine 'Bella'
This is probably the second time I have purchased this lipstick, mainly because its a pretty shiny nude that's perfect to throw on when your in need of a pick me up! I usually use this when I'm in a rush because its pretty and long lasting. I payed around £3 from boots and will probably keep repurchasing until I find something similar.

Rimmel 'Notting Hill Nude'
Out of all the lipsticks this is probably my favourite. I am probably quite fussy when it comes to nude lipsticks, some shades suit my skin tone others don't but I'd say this is the perfect colour for me & I hope to see this again. The best thing about this product has to be the price, cannot complain for £1! Goood eh?

Rimmel Kate Moss Matte Lipstick '107'
I just love this brand, especially because of the matte lipsticks. I do love a good gloss but a beautiful matte red is just perfect for all occasions. I loved this in winter and over used it! I has some purple tones in too and looks perfect with winged liner. At around £4 this is the most expensive lipstick out the bunch but defiantly worth to have in your collection.

Miss Sporty Perfect colour lipstick '054'
I really hate lipsticks that are named with numbers, although they are easier to find, I feel the brand could have been a little more creative. I bought this a few years ago as I was looking for an affordable coral lipstick. I absolutely love this brand, my favourite thing is that is smells of watermelons! I have reused this many times and always get compliments when wearing it.


Tuesday, 13 August 2013

Makeup brushes on a budget!


Having not had the best of everything and having to live on a tight budget, I have always looked out for the cheapest and best quality makeup products I could find, Here are a few I have picked up over the last year and I thought I would share.

Left to right.

Fraulein 3.8 Eyebrow brush
I received a set of makeup brushes from my boyfriend as a gift, this brush is from eBay in a set of 20 and cost around £9! I use this brush on a daily basis for my brows and it is my ultimate go to eye brush.

Fraulein 3.8 Flat brush 
I use this usually for my lid or under my brow, this is also from the set from eBay and it basically came with around 6 of these flat brushes in various sizes.

Megaga Professional blending brush 
If you are looking for a super cheap blending brush then this one is for you. This cost me around £3 again from eBay (yes you can tell I love eBay!) This is such a bargain brush, The wooden texture gives it a sturdy feel and the brush itself works a treat! Just as effective as a MAC or Crown brush.

Elf Blending Brush
Now I would not call this brush a blending brush, it feels more of a pencil brush. I adore this brush, Whilst not having a wide variety in brushes over the years, this has been useful for many things. Priced around £0.99 I would say this is the cheapest brush you can possible buy with the best quality.

M.Y.B Pencil Brush
Now can you guess where I purchased this brush from? ;) Yesss its eBay but I adore this brush! I payed around £3.99 so more expensive than the others but totally worth it. The quality is amazing and these brushes are long lasting so you get your moneys worth.

Fraunlein 3.8 Flat Brush
I use this everyday for my brows, this gives you the perfect shape brow and is super soft! Again from the set above.

Monday, 12 August 2013

My week in makeup


I recently began ' My week in nails' but as I'm very lazy with them lately I thought I would switch it up and do My week in Makeup. Here are a few makeup looks I have been wearing this week, hope you like!

Tuesday, 30 July 2013

Sally Hansen | DRY KWIK | Nail colour dryer


I paint my nails at least 3 times a week & being the most impatient person ever, this is a daunting thing for me to do as its very time consuming. I have eyed this nail polish up a few times now but only just decided to give it a go. Priced around £1.99 in B&M Stores it was pretty much a bargain.

I used this over a pink polish and set a timer, under a minute I had perfectly dry nails! How amazing!
The only disappointment I had with this product is that it left my fingers feeling greasy & oily but I don't mind as long as my nails are dry in no time.

I seriously recommend this product to anyone who hates waiting for their nails to dry or to anyone who doesn't have this in their nail polish collection

Have you tried this product? what do you think?

Wednesday, 17 July 2013

Budget Wednesday | They're Real Benefit Mascara Dupe


After hearing how good the Benefit mascara was, I couldn't wit to get my hands on the best beauty product on the market. First of all the packaging is lovely and the brush is usually what i go for. The only thing that put me off about the product was the price. Having a budget and getting good bargains is usually my type of thing, the thought of splashing out over £20 for a mascara was quite sickening.

At first I did not even like this mascara, I thought it was clumpy and made my eyes sore. After a million attempts of trying it I finally started getting the result I hoped for. Although I loved this product, the thought of running out and paying the expense annoyed me.

Looking through Superdrug I was eyeing up a cheap mascara for everyday use, something That I would'nt care about using up. I came across this NYC High definition mascara, price around £3 I was more than happy to purchase Having used this for a few months I am totally in love with the finish it provides, Its completely similar to the benefit's they're real mascara which is a huge bonus! Not only do they give the exact same finish, you will be saving yourself a whooping £18!!

Let me tell you – these dupe products are identical to the name brands for half the price! What more could you want?


Have you tried any of these mascaras?

Wednesday, 10 July 2013

Special Effects | DIY | Eye wound

Hey everyone,  Hope your all okay. today I have a little makeup tutorial for you, Not your average makeup but something a little different, Hope you enjoy :)

Firstly make sure under your eye is clean ready for the latex
Using a old brush, Apply liquid latex under your eye. This is a strong pungent smell so the fumes could sting your eyes a little, If you feel like it's too strong, close your eyes while the liquid dries, then the smell will disappear. 
Next add a few layers of the latex, I have used around 3 layers and left each one to dry before applying the next coat. 
Once your latex has dried it will look similar to this. Use a matte powder over the top to make it less shiny and too stay in place. You can also add a little foundation to blend into the skin, This makes it more effective. 
As you can see the latex looks blended into the skin. Once all is dried, use tweezers or your nails to peal the top edge of the latex whilst using powder on the skin. 
When you have pealed back some of the 'skin' Add a red lipstick onto the skin, Here I used MAC Russian Red. You can use any face paint or lipstick to create this effect. 
Add some dark purple & black lipstick to the red, this will give the illusion of cut skin. You can also use various dark eyeshadows to create this look too. 
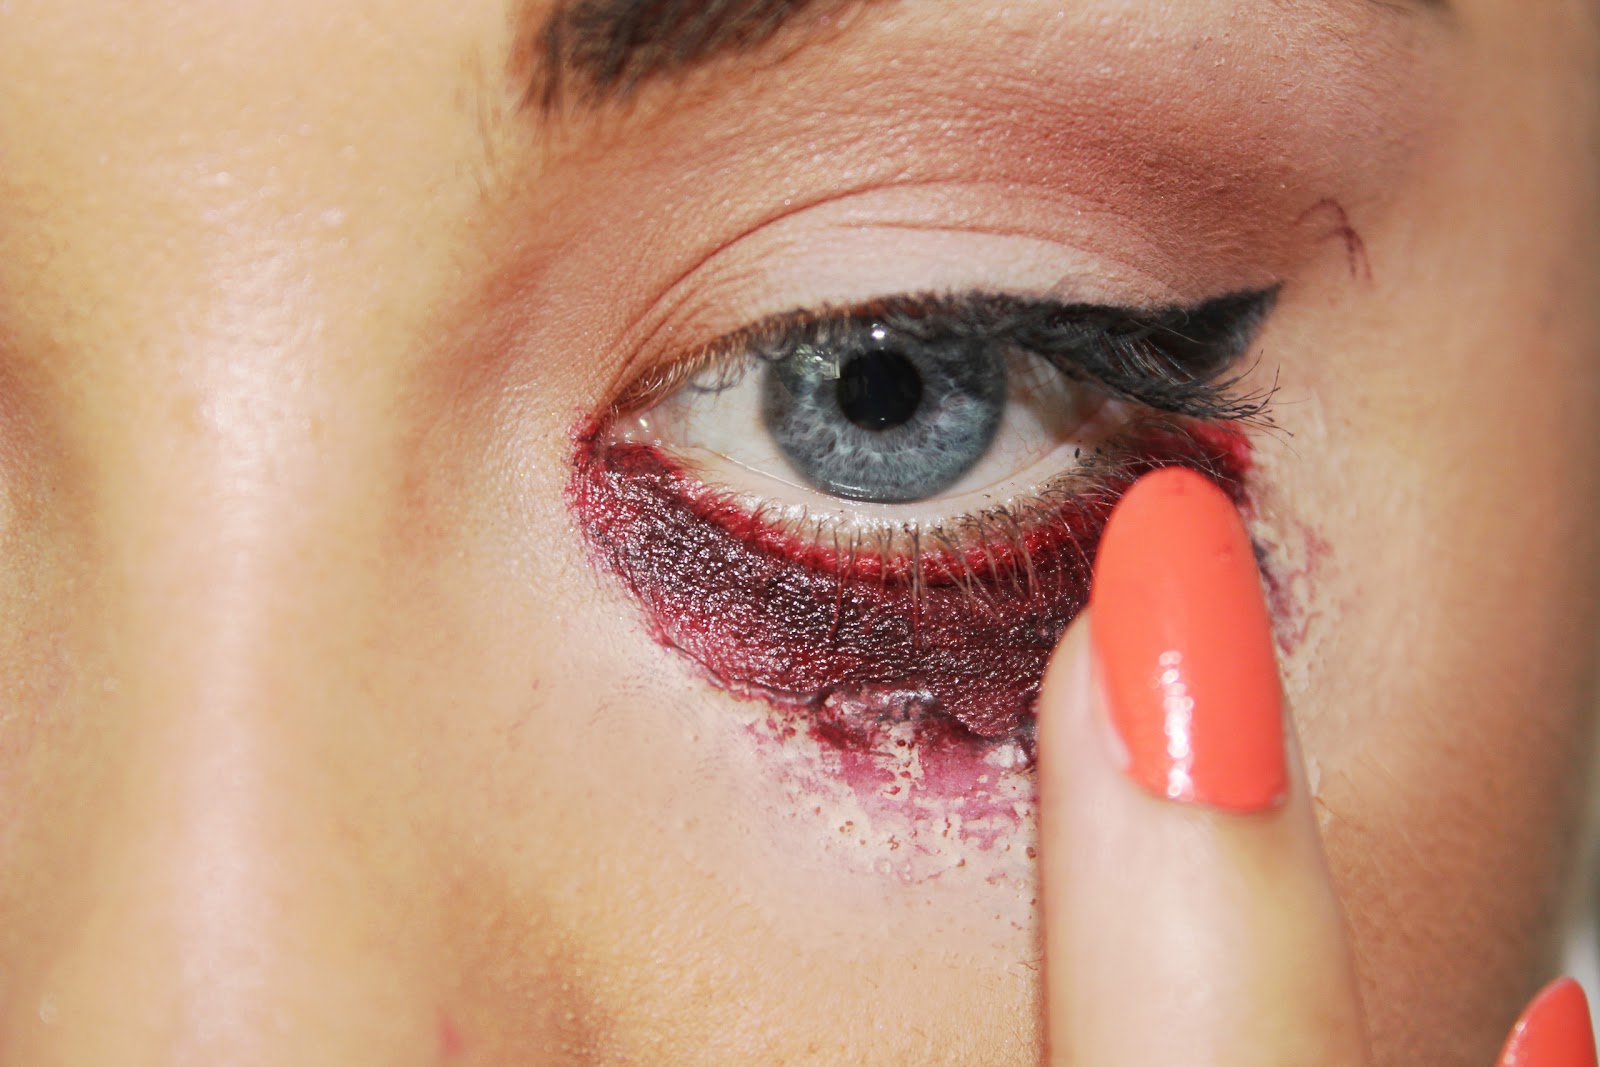
With your ring finger, Blend the colours together. Make sure your edges look blending into the skin to make it more of a real effect. 
Next is the fun part, The fake blood. Use a old brush and apply fake blood onto the 'cut'. With your tweezers peal the rest of the latex to give the illusion of torn skin. 
This is what the final result will look like and its super simple
You can mess about with the latex to make it bigger and bolder.
Finishing the look off with some dark shadows, give the eye a slightly bruised look. I used a blending brush for all of the shadows but you can use any.


Hope you enjoyed this pic-torial I have plenty of more coming soon :)

http://vonpixii.blogspot.co.uk/2013/03/special-effects-scar-tutorial.html - Learn how to do a Special Effects Scar